시소당
GCM 푸시서버 만들기 총 정리
배경지식 ( 이외에 여러사이트 참조 함.. )
http://prev.kr/apps/ColorScripter/ // 코드를 이쁘게 올려주는 사이트
쿼리 ( http://www.w3schools.com/sql/ )
select 문
FROM table_name;
and
예제
The following SQL statement selects the "CustomerName" and "City" columns from the "Customers" table:
Example
The following SQL statement selects all the columns from the "Customers" table:
Example
Insert 문
It is possible to write the INSERT INTO statement in two forms.
The first form does not specify the column names where the data will be inserted, only their values:
VALUES (value1,value2,value3,...);
The second form specifies both the column names and the values to be inserted:
VALUES (value1,value2,value3,...);
Example
VALUES ('Cardinal','Tom B. Erichsen','Skagen 21','Stavanger','4006','Norway');
Delete 문
The DELETE statement is used to delete rows in a table.
SQL DELETE Syntax
WHERE some_column=some_value;
Assume we wish to delete the customer "Alfreds Futterkiste" from the "Customers" table.
We use the following SQL statement:
Example
WHERE CustomerName='Alfreds Futterkiste' AND ContactName='Maria Anders';
Delete All Data
It is possible to delete all rows in a table without deleting the table. This means that the table structure, attributes, and indexes will be intact:
or
DELETE * FROM table_name;
쓰레드
RegID를 등록하기 위해서는 네트워크를 사용해야 한다. 사용자의 네트워크 상태에 따라 작업을 할 경우 오랫동안 응답이 없을 수 있다. 안드로이드는 5초 이상 응답이 없을 경우 애플리케이션을 강제 종료 시켜버리므로, 따라서 네트워크 작업은 쓰레드에서 해주어야 한다.
쓰레드의 사용 방법은 두가지가 존재하며, 아래의 블로그를 참조하면 더 자세한 정보를 얻을 수 있다.
1. 런어블을 구성하여 쓰레드에 넘기는 방법
2. 쓰레드 클래스를 상속받는 방법
1. Runnable 인터페이스를 구현 자바에서 인터페이스는 클래스 보다 좀 더 추상적인 개념이다. 가령, 로봇에 대한 속성(filed)이나 동작(method) 등을 클래스로 정의한다면, 어떻게 동작해야 하는 지 까지 새부 소스 코드를 작성해야 한다. 그러나, 인터페이스의 경우 어떠한 동작을 한다라고 까지만 명시할 뿐, 내부적으로 그 동작을 수행 하기 위한 소스 코드를 작성할 필요가 없다. Runnable 인터페이스는 run() 이라는 메소드(method-수행해야 하는 동작) 하나만 달랑 가지고 있다. 그러므로 Runnable 인터페이스를 구현(implements) 한 클래스에서 run() 메소드를 오버라이딩(overridng) 하여 스레드가 동작하면 어떠한 작업을 수행할 것인지를 run() 메소드 내에서 명시해 줘야 한다. 그 사용 예는 아래와 같다.
2. Thread 클래스를 상속 Thread 클래스 자체는 Runnable 인터페이스를 구현했다. 물론, run() 메소드는 개발자가 다시 오버라이딩 하여 원하는 작업을 수행하도록 정의해야 한다. 아래는 그 예이다.
두 가지 예에서 공통점이 모두 start() 를 호출하여 스레드를 시작한다는 점이다. 위 두 가지 방법 중 더 자주 쓰이는 방법은 1 번의 방법이다. 자바는 C++ 처럼 다중 상속을 허용하지 않는다. 즉, extends class1, class2 처럼 동시에 두 가지 클래스를 상속할 수 없으며, extends class1 이든 extends class2 이든 한 번에 하나만 상속해야 한다. 그러므로, Thread 클래스를 상속하여 subclass 를 만들 경우, 동시에 다른 클래스를 상속할 수 없는 단점이 있다. 그러므로 Runnable 인터페이스를 구현하는 방법이 더 많이 쓰인다.
|
[ 인용 ] http://blog.naver.com/PostView.nhn?blogId=myca11&logNo=80130599386 [ 좀 더 확실한 설명이 되어 있는 책 ] HeadPlus Java 쓰레드 편을 참조하면 개념을 이해가 더 쉽다. |
서버에 올려주는 객체를 만들기 위해서 쓰레드를 상속받아서 사용하기로 하였다. 그 코드를 하나씩 설명하면 아래와 같다.
데이터 형식
x-www-form-urlencode http 프로토콜에서 request 나 response 메세지가 발생할 시, 그 메세지는 헤더(header)를 가지고 있다. 이 헤더는 http 트랜젝션이 동작하는 것에 대해서 기술한다. http header 에 대해서 살펴보는 것은 다음으로 하고, 오늘 살펴 볼 것은 http header 의 속성 중에 content-type 이라는 것이 있다. 이는 request 나 response 메세지 모두에서 해당하는 값이다. 집중적으로 살펴볼 것은 request 메세지를 보낼 때 content-type 이 어떤 값을 가져야 하는 것인가이다. request 라는 말 자체에서도 알 수 있듯이 우리가 서버에 무언가를 요청한다는 의미이고, 이 때 서버에 뭔가를 요청할 때, 무엇을 요청할 것인지에 대한 정보 정도는 보내줘야 한다. 가령, 우리가 무언가를 검색한다고 치자. 그럼 무엇을 검색했는 지 검색어 정도는 서버에 보내줘야 한다. 좀 더 구체적으로 예를 들어보자. 여기는 네이버 블로그이니까 네이버에서 'OECD' 에 대해서 검색한다 치면, 검색창에 OECD 라고 치고 나서 엔터키를 누르게 될 것이다. 이 때 엔터를 치면, request 메세지가 네이버 검색 서버로 넘어간다. 이 때, request 메세지에는 OECD 라는 정보를 가지고 있어야 할 것이다. 그럼 서버에서는 request 메세지 안에서 OECD 라는 값을 찾아낸 뒤에, 해당 OECD 에 해당하는 웹 페이지들을 DB 에서 검색할 것이다. 그리고 (요청한 사람에게 보여주기 위해서) 검색해서 받은 데이터들을 가지고 html 파일을 만든 뒤, 요청한 사람에게 해당 html 파일을 보내준다. 약간 곁 가지를 좀 더 치자면, 네트워크 상에서 다양한 종류의 데이터들이 전송될 수 있고, 그러므로, 각 타입에 따라 서로 다른 방식으로 전송되야 할 수도 있다. 그래서 타입마다 공통된 약속을 정해 놓고 약속에 따라 해당 데이터를 전송하게 된다. html 과 같이 하이퍼텍스트(hypertext) 문서를 보낼 때는 http 라는 프로토콜(약속 혹은 규약) 에 따라 데이터를 주고 받게 된다. (http 은 hypertext transfer protocol 의 약자이다. 우리는 http://www.naver.com 처럼 주소창에 http 라고 적혀있는 것을 많이 봤을 것이다. 이는 html (Hypertext Markup Language) 과 같은 hypertext 문서를 네트워크 상에서 전송할 때, 어떠한 방식으로 주고 받을 것인지를 정해놓은 약속 혹은 규약이다.) 자, 그럼 진짜 본론으로 들어가서 content-type 은, (OECD 처럼) request 메세지에 포함되어야 하는 정보가 있을 때, 그 데이터 타입이 어떠해야 하는지를 나타낸다. 그런데 모든 request 메세지에 다 지정해 줄 필요가 있는 것은 아니고, request 메세지가 전송되는 방식은 여러가지가 있는데, 그 중 post 나 put 의 경우 content-type 을 지정해줘야 한다. content-type 이 가질 수 있는 값은 MIME type 의 값 들이다. 그럼 MIME type 이 뭔지 또 살펴보자. 에고 공부할게 많다. 인터넷 메디아 타입(internet media type) 이라고도 불리는 이 타입은, Multipurpose Internet Mail Extension 의 약자이다. 처음에 MIME 타입은, SMTP(인터넷 프로토콜(IP) 에서 e-mail 을 보낼 때 사용되던 프로토콜) 를 통해 e-메일을 보낼 때 사용되는 것이 지금은 다른 프로토콜에서도 확장되어 사용되고 있다. MIME 타입은 아스키코드(ASCII code) 로 기술 될 수 없는 메세지를 인코딩 하여 보내는 것을 가능하게 해준다. 즉, 영어 외의 일본어 한국어 같은 것들도 표현하여 메세지를 보낼 수 있다는 의미이다. 또한 그림, 음악, 영화, 컴퓨터 프로그램과 같은 8비트 바이너리 파일을 전자우편으로 보낼 수 있도록 한다. (참고 : http://ko.wikipedia.org/wiki/MIME#Content-Type) MIME type 은 크게 두 부분으로 나누어 진다. type 과 subtype 으로 나누어 지는데, subtype 에 따라 추가적으로 파라미터를 가질 수 있다. 아래 예를 보자. <%@ page contentType="text/html; charset=utf-8" pageEncoding="euc-kr" %> JSP 파일을 작성할 때 맨 서두에 포함되는 부분이다. 여기도 contentType 이라고 적힌 부분을 볼 수 있다. 여기서 type 에 해당하는 부분이 text, subtype 에 해당하는 부분이 html 이며, charset=utf-8 은 subtype 이 html 일 때 가질 수 있는 파라미터에 해당하는 값이다. 이제 마지막이다. request 메세지를 post 방식으로 서버에 보낼 때, MIME type 은 무엇이어야 하는가?? post 방식으로 보낸 다는 것은, request 메세지가 헤더 부분 말고도 따로 데이터를 저정할 수 있는 저장 공간이 있으며, 그러므로 보내려는 정보를 이 공간에다 저장해서 보내는 방식이 post 방식이다. 웹 브라우저에서 web form 엘리먼트로 부터 post 방식으로 데이터를 보낼 때, 표준 MIME type 이 바로 application/x-www-form-urlencoded 이다. (web form 엘리먼트라는 말은 우리가 검색창에서 검색어를 입력한 뒤, 그 입력값을 전달할 수 있는 것처럼, 사용자의 input 을 받아서 처리할 수 있도록 해주는 엘리먼트를 의미한다.) application/x-www-form-urlencoded 방식을 선택하면, key-value 형태로 인코딩 하게 된다. 가령, 위의 예제에서 검색어가 OECE 일 경우, search=OECD 이런 식으로 인코딩 될 것이다. 만약 검색을 OECD UN 이렇게 두 단어로 했다면, search=OECD&search=UN 이렇게 인코딩 될 것이다. 참고로, 스페이스의 경우, 인코딩 되면 + 로 바뀐다. 아래는 application/x-www-form-urlencoded 타입으로 인코딩 했을 때를 보여준다. |
[ 인용 ] http://blog.naver.com/myca11/80131096119 |
기타 HTML 코드
http://www.zetswing.com/bbs/board.php?bo_table=JS_TIP&wr_id=81 // 페이지 이동 없이 PHP에서 데이터를 처리하는 코드
PHP 서버단 코드
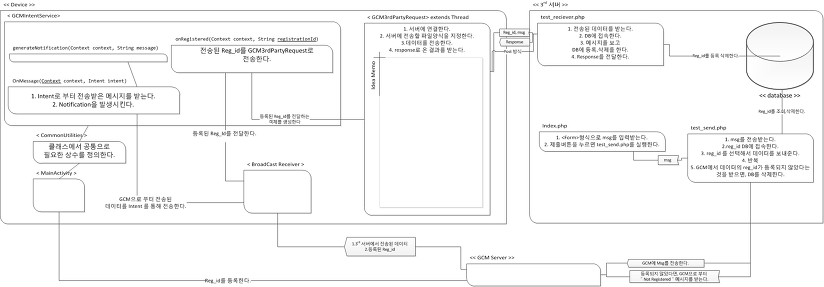
시스템 구조
메시지를 등록하여 보내는 코드
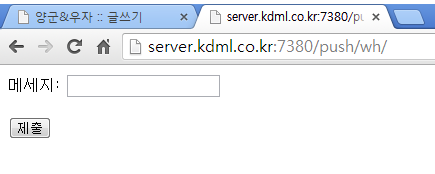
1 2 3 4 5 6 7 8 9 10 11 12 13 14 15 | <script language="javascript"> function save_fr() { var form = document.msg_form; form.target = "hid_fun" form.submit(); return false; } </script> style="display:none" <iframe name="hid_fun" ></iframe> <form name="msg_form" action="test_send.php" method="post"> <p>메세지: <input type="text" name="msg_a" /></p> <p><input type="button" onClick="save_fr();" value="제출"/></p> </form> |
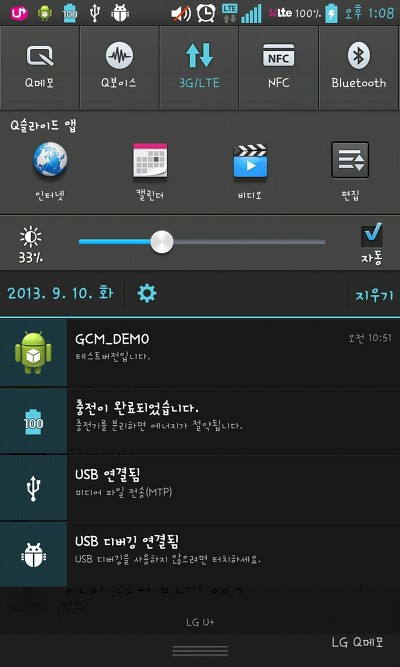
< 실행 화면 >
PHP 용 서버, 디바이스에서 받은 register_id를 데이터베이스에 등록하는 PHP파일
1 2 3 4 5 6 7 8 9 10 11 12 13 14 15 16 17 18 19 20 21 22 23 24 25 26 27 28 29 30 31 32 33 34 35 36 37 38 39 40 41 42 43 44 45 46 47 48 49 50 | <?php $HOST="localhost"; $DBNAME="lamp_test"; $DBUSER="student"; $DBPW="1234"; $response=array(); $data=array(); if(isset($_POST['reg_id'])&&(isset($_POST['msg']))) { $reg_id=$_POST['reg_id']; $msg=$_POST['msg']; $data["reg_id"] = $reg_id; $data["msg"] = $msg; echo json_encode($data); $connect=mysql_connect($HOST,$DBUSER,$DBPW) or die("Failed to connect MY-SQL"); // DB접속에 성공했다면 $result_select_db는 null이 아니다. $result_select_db = mysql_select_db($DBNAME,$connect); if($result_select_db == null) { echo("DB접속에 실패했습니다."); } else { if ($msg == "register") $result = mysql_query("INSERT INTO test_table(reg_id,msg) VALUES('$reg_id','$msg')"); else $result = mysql_query("Delete From test_table WHERE reg_id='$reg_id'"); if ($result) { // successfully inserted into database $response["success"] = 1; $response["message"] = "Success."; echo json_encode($response); } else { // failed to insert row $response["success"] = 0; $response["message"] = "Oops! An error occurred."; echo json_encode($response); } } // end else } // end if else { // required field is missing $response["success"] = 0; $response["message"] = "Required field(s) is missing"; echo json_encode($response); } // end else ?> |

1 2 3 4 5 6 7 8 9 10 11 12 13 14 15 16 17 18 19 20 21 22 23 24 25 26 27 28 29 30 31 32 33 34 35 36 37 38 39 40 41 42 43 44 45 46 47 48 49 50 51 52 53 54 | <?php /* * 데이터베이스에 접속하는데 필요한 정보를 입력한다. */ $HOST="localhost"; $DBNAME="lamp_test"; $DBUSER="student"; $DBPW="1234"; $headers=array('Content-Type:application/json','Authorization:key=AIzaSyD1B-0C71NUgv-aaeCe8H0rfVC3vWoqfok'); $arr=array(); $arr['data']=array(); $arr['data']['msg']=urlencode($_POST['msg_a']); $arr['registration_ids']=array(); $i = 0; $connect=mysql_connect($HOST,$DBUSER,$DBPW) or die("Failed to connect MY-SQL"); $result_select_db = mysql_select_db($DBNAME,$connect); if($result_select_db == null) { echo("DB접속에 실패했습니다."); } else { /* * 테이블에서 reg_id를 가져오는 구분 */ mysql_query('SET CHARACTER SET utf8'); $result = mysql_query("SELECT reg_id FROM test_table"); while($row = mysql_fetch_array($result)) { $arr['registration_ids'][$i]=$row['reg_id']; $ch=curl_init(); curl_setopt($ch,CURLOPT_URL,'http://android.googleapis.com/gcm/send'); curl_setopt($ch,CURLOPT_HTTPHEADER, $headers); curl_setopt($ch,CURLOPT_POST, true); curl_setopt($ch,CURLOPT_RETURNTRANSFER,true); curl_setopt($ch,CURLOPT_SSL_VERIFYPEER,false); curl_setopt($ch,CURLOPT_POSTFIELDS,json_encode($arr)); $reponse=curl_exec($ch); // 만약 디바이스가 Uninstall 되었다면, GCM에서 메시지를 받아서 DB를 삭제한다. $obj=json_decode($reponse,true); var_dump($obj); if ( $obj['results'][0]['error'] == "NotRegistered" ) { $reg_id = $row['reg_id']; mysql_query("Delete From test_table WHERE reg_id=''"); } } } ?> |
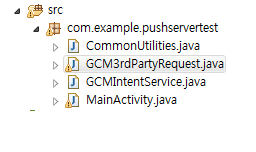
CommonUtility.java
1 2 3 4 5 6 7 8 9 10 11 12 13 14 15 16 17 18 19 20 21 22 23 24 25 26 27 28 29 30 31 32 33 34 35 36 37 38 39 40 41 42 43 44 45 46 47 48 49 50 51 52 53 54 55 56 57 58 59 60 61 62 63 64 65 66 67 68 69 70 71 72 73 74 75 76 77 78 79 80 81 82 83 | package com.example.pushservertest; import org.json.JSONException; import org.json.JSONObject; import android.content.Context; import android.content.Intent; /** * Helper class providing methods and constants common to other classes in the * app. */ public final class CommonUtilities { /** * Google API project id registered to use GCM. */ static final String SENDER_ID = "10777641425"; // Google API console ?먯꽌 ?살? Project ID 媛믪쓣 ?ㅼ젙 static final String SERVER_URL = "http://server.kdml.co.kr:7380/push/wh/test_receiver.php"; // 데이터베이스를 등록하는 서버 /** * Intent used to display a message in the screen. */ static final String DISPLAY_MESSAGE_ACTION="com.google.android.gcm.pushservertest.app.DISPLAY_MESSAGE"; /** * Intent's extra that contains the message to be displayed. */ static final String EXTRA_MESSAGE = "message"; /** * Intent's extra that contains the message to be displayed. */ public static String PROPERTY_REG_ID = "registration_id"; /** * Notification's Icon */ public static int noti_icon = R.drawable.ic_launcher; /** * Notifies UI to display a message. * <p> * This method is defined in the common helper because it's used both by * the UI and the background service. * * @param context application's context. * @param message message to be displayed. */ /** * Message to server to request * */ public static String register = "register"; public static String delete = "delete"; static void displayMessage(Context context, String message) { Intent intent = new Intent(DISPLAY_MESSAGE_ACTION); intent.putExtra(EXTRA_MESSAGE, message); context.sendBroadcast(intent); } static String JsonParser(String Jsondata) { String resultStr = ""; try { JSONObject jObj = new JSONObject(Jsondata); resultStr += jObj.getString("msg"); } catch (JSONException e) { // TODO: handle exception } return resultStr; } } |
GCM3rdPartyRequest.Java
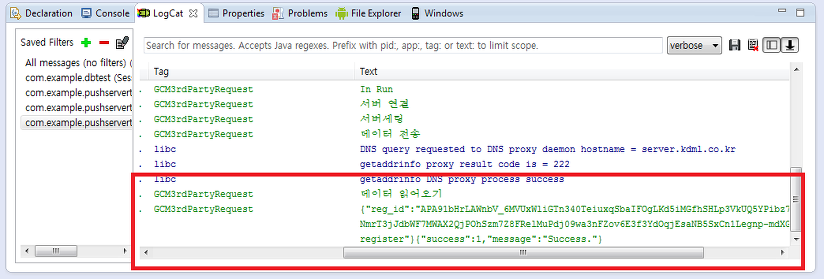
1 2 3 4 5 6 7 8 9 10 11 12 13 14 15 16 17 18 19 20 21 22 23 24 25 26 27 28 29 30 31 32 33 34 35 36 37 38 39 40 41 42 43 44 45 46 47 48 49 50 51 52 53 54 55 56 57 58 59 60 61 62 63 64 65 66 67 68 69 70 71 72 73 74 75 76 77 78 79 80 81 82 83 84 85 86 | package com.example.pushservertest; import java.io.BufferedReader; import java.io.IOException; import java.io.InputStreamReader; import java.io.OutputStreamWriter; import java.io.PrintWriter; import java.net.HttpURLConnection; import java.net.MalformedURLException; import java.net.URL; import android.os.AsyncTask; import android.util.Log; public class GCM3rdPartyRequest extends Thread { public final String TAG = "GCM3rdPartyRequest"; private String mAddr; private String mResult; private String reg_id; private String msg; public GCM3rdPartyRequest(String addr, String reg_id, String msg) { mAddr=addr; mResult=""; this.reg_id=reg_id; this.msg = msg; } @Override public void run() { Log.i(TAG, "In Run"); // Thread를 싱행한다. super.run(); StringBuilder html=new StringBuilder(); // 서버를 연다. URL url; try { // 서버를 연다. Log.i(TAG, "서버 연결"); url = new URL(mAddr); HttpURLConnection conn=(HttpURLConnection)url.openConnection(); Log.i(TAG, "서버세팅"); // 서버를 세팅한다. 서버 전송 방식은 POST를 사용한다. conn.setDefaultUseCaches(false); conn.setDoInput(true); // 서버에서 읽기 모드 지정 conn.setDoOutput(true); // 서버로 쓰기 모드 지정 conn.setRequestMethod("POST"); // 데이터 전송양식은 x-www-form-urlencoded 로 사용한다. 필요하다면 , json을 사용해도 된다. conn.setRequestProperty("content-type", "application/x-www-form-urlencoded"); StringBuffer buffer = new StringBuffer(); buffer.append("reg_id").append("=").append(reg_id).append("&"); buffer.append("msg").append("=").append(msg); Log.i(TAG, "데이터 전송"); PrintWriter pw = new PrintWriter(new OutputStreamWriter(conn.getOutputStream(), "utf-8")); pw.write(buffer.toString()); //write하는순간 서버인(php)로 buffer 데이터 넘어감. pw.flush(); Log.i(TAG, "데이터 읽어오기"); BufferedReader br=new BufferedReader(new InputStreamReader(conn.getInputStream())); while(true){ String line=br.readLine(); if(line==null) break; html.append(line); } br.close(); mResult=html.toString(); Log.i(TAG,mResult); } catch (MalformedURLException e) { // TODO Auto-generated catch block e.printStackTrace(); } catch (IOException e) { // TODO Auto-generated catch block e.printStackTrace(); } } } |
GCMIntentService.java
1 2 3 4 5 6 7 8 9 10 11 12 13 14 15 16 17 18 19 20 21 22 23 24 25 26 27 28 29 30 31 32 33 34 35 36 37 38 39 40 41 42 43 44 45 46 47 48 49 50 51 52 53 54 55 56 57 58 59 60 61 62 63 64 65 66 67 68 69 70 71 72 73 74 75 76 77 78 79 80 81 82 83 84 85 86 | package com.example.pushservertest; import java.io.BufferedReader; import java.io.IOException; import java.io.InputStreamReader; import java.io.OutputStreamWriter; import java.io.PrintWriter; import java.net.HttpURLConnection; import java.net.MalformedURLException; import java.net.URL; import android.os.AsyncTask; import android.util.Log; public class GCM3rdPartyRequest extends Thread { public final String TAG = "GCM3rdPartyRequest"; private String mAddr; private String mResult; private String reg_id; private String msg; public GCM3rdPartyRequest(String addr, String reg_id, String msg) { mAddr=addr; mResult=""; this.reg_id=reg_id; this.msg = msg; } @Override public void run() { Log.i(TAG, "In Run"); // Thread를 싱행한다. super.run(); StringBuilder html=new StringBuilder(); // 서버를 연다. URL url; try { // 서버를 연다. Log.i(TAG, "서버 연결"); url = new URL(mAddr); HttpURLConnection conn=(HttpURLConnection)url.openConnection(); Log.i(TAG, "서버세팅"); // 서버를 세팅한다. 서버 전송 방식은 POST를 사용한다. conn.setDefaultUseCaches(false); conn.setDoInput(true); // 서버에서 읽기 모드 지정 conn.setDoOutput(true); // 서버로 쓰기 모드 지정 conn.setRequestMethod("POST"); // 데이터 전송양식은 x-www-form-urlencoded 로 사용한다. 필요하다면 , json을 사용해도 된다. conn.setRequestProperty("content-type", "application/x-www-form-urlencoded"); StringBuffer buffer = new StringBuffer(); buffer.append("reg_id").append("=").append(reg_id).append("&"); buffer.append("msg").append("=").append(msg); Log.i(TAG, "데이터 전송"); PrintWriter pw = new PrintWriter(new OutputStreamWriter(conn.getOutputStream(), "utf-8")); pw.write(buffer.toString()); //write하는순간 서버인(php)로 buffer 데이터 넘어감. pw.flush(); Log.i(TAG, "데이터 읽어오기"); BufferedReader br=new BufferedReader(new InputStreamReader(conn.getInputStream())); while(true){ String line=br.readLine(); if(line==null) break; html.append(line); } br.close(); mResult=html.toString(); Log.i(TAG,mResult); } catch (MalformedURLException e) { // TODO Auto-generated catch block e.printStackTrace(); } catch (IOException e) { // TODO Auto-generated catch block e.printStackTrace(); } } } |
MainActivity.java
1 2 3 4 5 6 7 8 9 10 11 12 13 14 15 16 17 18 19 20 21 22 23 24 25 26 27 28 29 30 31 32 33 34 35 36 37 38 39 40 41 42 43 44 45 46 47 48 49 50 51 52 53 54 55 56 57 58 59 60 61 62 63 64 65 | package com.example.pushservertest; import com.google.android.gcm.GCMRegistrar; import android.os.Bundle; import android.app.Activity; import android.content.BroadcastReceiver; import android.content.Context; import android.content.Intent; import android.content.IntentFilter; import android.util.Log; public class MainActivity extends Activity { private static final String TAG = "GCM"; @Override protected void onCreate(Bundle savedInstanceState) { super.onCreate(savedInstanceState); setContentView(R.layout.activity_main); registerReceiver(mHandleMessageReceiver, new IntentFilter(CommonUtilities.DISPLAY_MESSAGE_ACTION)); // GCM 등록 여부를 확인한다. try { GCMRegistrar.checkDevice(this); GCMRegistrar.checkManifest(this); } catch (Exception e) { // TODO: handle exception Log.e(TAG,"This device can't use GCM"); } final String regId = GCMRegistrar.getRegistrationId(this); if ( regId.equals("")) { GCMRegistrar.register(this, CommonUtilities.SENDER_ID); Log.i(TAG, "Device registered"); Log.i(TAG, "Device registered: regId = " + regId); } else { Log.i(TAG,"Already registered"); Log.i(TAG, "Already Device registered: regId = " + regId); } } @Override protected void onDestroy() { unregisterReceiver(mHandleMessageReceiver); GCMRegistrar.onDestroy(getApplicationContext()); super.onDestroy(); } // BR 보내온 데이터를 받아오는 역활을 한다. 받아오는 파일의 형식은 Extra 이다. private final BroadcastReceiver mHandleMessageReceiver = new BroadcastReceiver() { @Override public void onReceive(Context context, Intent intent) { } }; // end BroadcastReceiver } // end class 출처 : http://baramziny.tistory.com/entry/GCM-%ED%91%B8%EC%8B%9C%EC%84%9C%EB%B2%84-%EB%A7%8C%EB%93%A4%EA%B8%B0-%EC%B4%9D-%EC%A0%95%EB%A6%AC |