시소당
[안드로이드]ndk란?
NDK
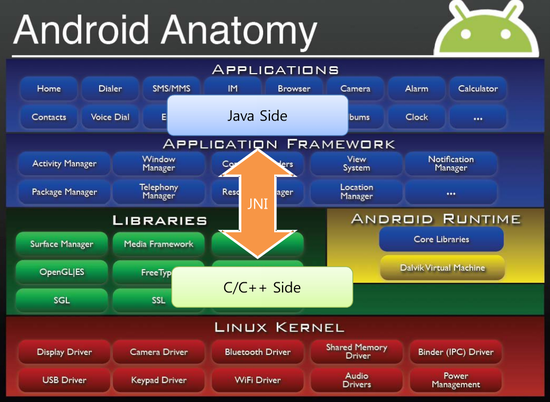
java만 사용하여 필요한 기능과 성능을 모두 만족시키기는 힘들다. 그래서 C나 C++ 언어로 작성된 프로그램을 java에서 사용할 수 있도록 JDK에서 제공하는 것이 JNI(Java Native Interface) 이다.
그리고 NDK는 Developer문서에서도 볼 수 있듯이
The Android NDK is a toolset that lets you implement parts of your app using native-code languages such as C and C++. For certain types of apps, this can help you reuse code libraries written in those languages.
[출처] JNI 구현을 위한 사용순서|작성자 스시왕과삼천궁어
이것을 가능하게 해주는 툴킷이라고 보면 된다.
NDK를 사용하여 얻을 수 있는 장점
1. 기존에 C로 만들어진 대규모 코드를 JAVA에서 다시 만들 필요없이 재사용이 가능하다.
2. 시스템 디바이스 접근과 JAVA성능을 넘어선 작업이 필요할때 유용하다.
3. 속도 및 성능을 향상시킬 수 있다.
이러한 장점때문에 NDK는 주로 영상처리, 게임, 신호처리, 물리 시뮬레이션 등에 사용된다.
ndk를 사용하기 위해서 리눅스 환경이 필요하다.
1. android SDK Manager에서 NDK를 설치한다.
2. vi /etc/profile 로 ndk경로와 java경로를 설정한다.

3. source /etc/profile 로 적용시킨다.
android프로젝트 생성
main 밑에다가 jni폴더 생성
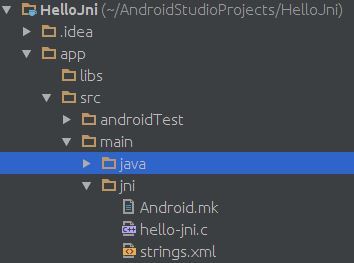
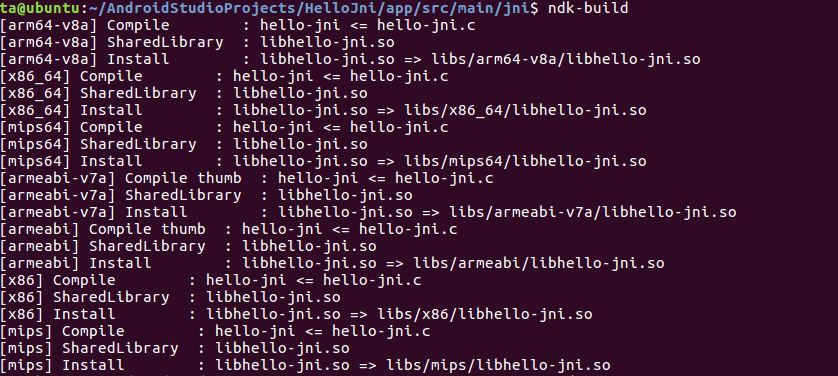
Android.mk파일과 c파일을 만들고 ndk-build 명령어를 입력하면 libs/x86/libhello-jni.so 파일이 생성된다.
*Android.mk 형식
Android.mk
LOCAL_PATH := $(call my-dir)
include $(CLEAR_VARS)
LOCAL_MODULE := hello-jni
LOCAL_SRC_FILES := hello-jni.c
include $(BUILD_SHARED_LIBRARY)
hello-jni.c
#include <string.h>
#include <jni.h>
jstring Java_com_example_ta_hellojni_HelloJni_stringFromJNI(JNIEnv* env, jobject thiz)
{
return (*env)->NewStringUTF(env, "Hello From JNI !");
}
<?xml version="1.0" encoding="utf-8"?>
<resource>
<string name="app_name">HelloJni</string>
</resource>
HelloJni.java
package com.example.ta.hellojni;
import android.app.Activity;
import android.widget.TextView;
import android.os.Bundle;
public class HelloJni extends Activity {
@Override
protected void onCreate(Bundle savedInstanceState) {
super.onCreate(savedInstanceState);
TextView tv = new TextView(this);
//call Native function
tv.setText(stringFromJNI());
setContentView(tv);
}
// java에서 사용할 네이티브 함수의 선언
public native String stringFromJNI();
// 네이티브 함수를 사용하기 위하여 동적 라이브러리를 로딩
static {
System.loadLibrary("hello-jni");
}
}
자동으로 ndk-build 실행하기
build.gradle 을 다음과 같이 작성한다.
apply plugin: 'com.android.model.application'
model {
android {
compileSdkVersion = 23
buildToolsVersion = "23.0.0"
defaultConfig {
applicationId = "com.example.ta.ndkadd"
minSdkVersion.apiLevel = 19
targetSdkVersion.apiLevel = 23
versionCode = 1
versionName = "1.0"
}
buildTypes {
release {
minifyEnabled = false
proguardFiles.add(file('proguard-android.txt'))
}
}
ndk {
moduleName = "ndk-add"
}
}
}
dependencies {
compile fileTree(dir: 'libs', include: ['*.jar'])
testCompile 'junit:junit:4.12'
compile 'com.android.support:appcompat-v7:23.0.0'
}
그리고 run을 시켜주면
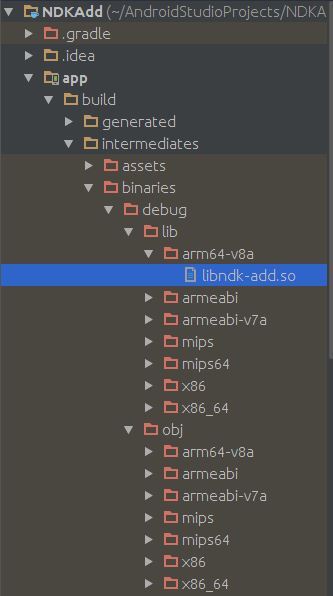
자동으로 .so파일이 생성된다.
C로 작성된 소스를 안드로이드 스튜디오의 logcat에서 디버깅하려면
1. gradle에 작성한 ndk부분을 다음과 같이 수정한다.
ndk {
moduleName = "ndk-call"
toolchain = "clang"
stl = 'gnustl_static'
cppFlags.addAll(['-std=c++11', '-Wall', '-D__STDC_INT64__'])
ldLibs.addAll(['android', 'log'])
}
2. c소스파일에
#include <android/log.h>
를 추가해준다.
3. c소스파일에 디버그명령어를 입력하면 logcat에서 볼 수 있다.
__android_log_print (ANDROID_LOG_INFO, "Ndk-call", "Hello~~~");
SSISO Community